You know that feeling when you’re gliding across a glassy lake in your trusty red kayak, the sun warming your face as you take in the breathtaking scenery? It’s pure bliss. Well, here’s a little tidbit that might blow your mind: with the right TLC, your awesome red kayak could be your adventure buddy for a whopping 15-20 years or even longer.
I’ll never forget the day I learned this lesson the hard way. There I was, proudly showing off my shiny new red kayak to my buddy Mike. This baby’s going to last me a lifetime! I boasted. Fast forward two years, and I’m staring at a faded, cracked hull, wondering where I went wrong. Spoiler alert: I went wrong in about a dozen ways, but hey, live and learn, right?
That’s why I’m here today, Friends. I’m gonna share all the juicy tips and tricks I’ve picked up over the years to keep your red kayak in tip-top shape. Trust me, a little effort goes a long way in extending your kayak’s lifespan. And let’s be real – who doesn’t want to save some serious cash and keep their kayak performing like a champ for years to come?
In this guide, we’re gonna cover everything from cleaning routines that’ll make your kayak sparkle to storage hacks that’ll make your garage the envy of every paddler on the block. We’ll talk about UV protection (because nobody likes a sunburned kayak), maintenance musts, and even some DIY repair magic. By the time we’re done, you’ll be a bonafide kayak care expert.
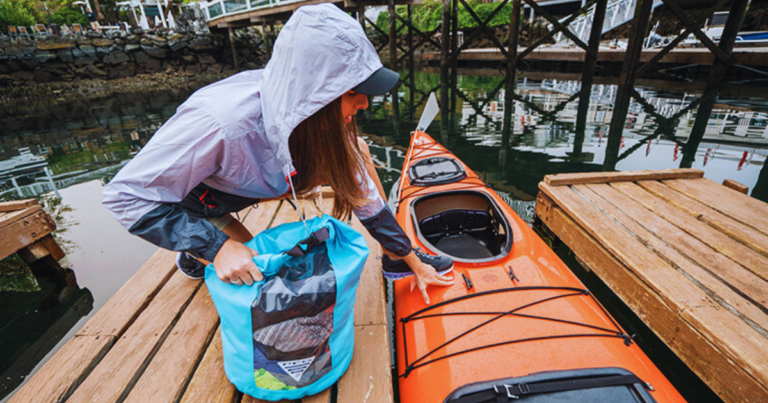
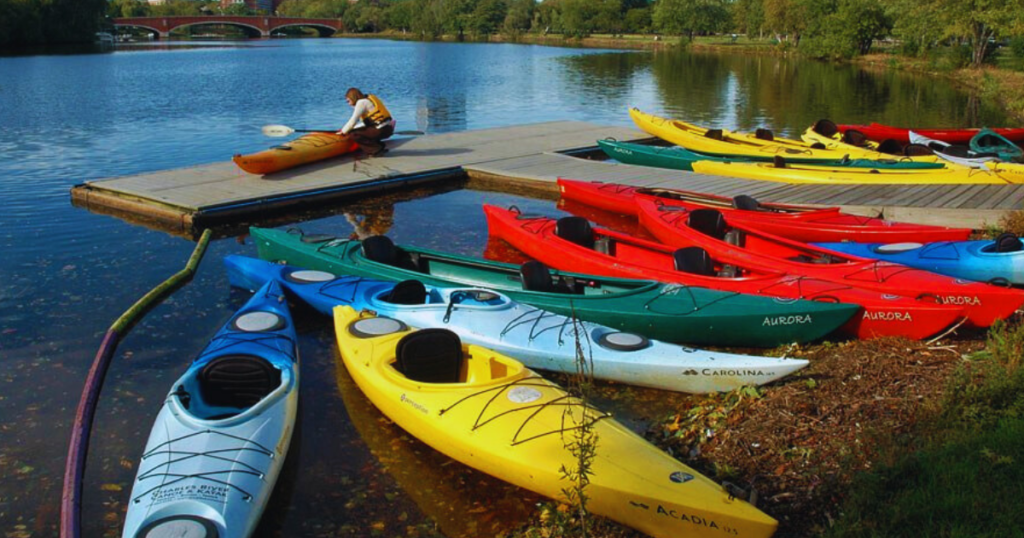
Clean Your Kayak After Every Use
If there’s one thing I’ve learned the hard way, it’s that cleaning your kayak after every use is an absolute game-changer. I used to be that guy who’d come home from a long day of paddling, toss my kayak in the garage, and promise myself I’d clean it “tomorrow.” Spoiler alert: tomorrow never came, and before I knew it, my beautiful red kayak looked like it had been through a mud wrestling match with a swamp monster.
Every time you take your kayak out for a spin, it’s picking up all sorts of nasty stuff. Salt, sand, algae, you name it. And let me tell you, that gunk is not your kayak’s friend. It’s like letting a bunch of tiny gremlins set up camp on your boat, slowly but surely eating away at the material.
Make it part of your post-paddle routine. It’s like brushing your teeth before bed – a little annoying at first, but soon it becomes second nature.
Start by giving your kayak a good rinse with fresh water. Don’t be shy – get in there and make sure you’re washing away all that grit and grime. Pay extra attention to those nooks and crannies where dirt loves to hide. Do you know that little space where your seat meets the hull? Yeah, that’s a dirt magnet.
Once you’ve given it a good rinse, it’s time to get a bit more hands-on. Grab a soft sponge or cloth and some mild soap. And when I say mild, I mean mild. No harsh chemicals here, folks! We’re not trying to strip paint, we’re just trying to get our kayak clean. Work your way from bow to stern, giving extra love to any particularly dirty spots.
Now, here’s where a lot of people mess up – they forget to dry their kayak. Big mistake! Leaving your kayak wet is like rolling out the red carpet for mould and mildew. And let me tell you, once those fungi move in, they’re worse than bad roommates – they never want to leave.
So, grab a towel and give your kayak a good rubdown. Pay special attention to areas where water might pool, like around the cockpit or in any crevices. If you’re feeling fancy, you can even use a leaf blower to speed up the drying process. Just be careful not to blast sand or debris all over your freshly cleaned kayak.
Protect Your Kayak from UV Damage
Alright, paddlers, let’s talk about something that’s often overlooked but is an absolute kayak killer: UV damage. You know how we slather on sunscreen to protect our skin from those harsh rays? Well, your kayak needs the same kind of TLC.
I learned this lesson the hard way when I left my first kayak out in the sun for an entire summer. By the time fall rolled around, my once vibrant red beauty looked more like a sad, faded pink flamingo. Talk about a facepalm moment.
Here’s the thing: UV rays are like tiny ninjas, silently attacking your kayak’s material. They cause the colour to fade, sure, but that’s just the tip of the iceberg. The real damage happens when UV exposure makes the material brittle and weak. And trust me, a brittle kayak is not something you want to discover when you’re out in the middle of a lake.
So, how do we fight back against these solar saboteurs? First up, invest in a good UV-resistant spray or wax. Think of it as sunscreen for your kayak. I usually apply it at the start of each season and then reapply every few months, especially if I’m taking a lot of sunny day trips.
When you’re applying the UV protectant, make sure you cover every inch of your kayak. Don’t forget about the underside – the sun can reflect off the water and hit your hull from below. Pay extra attention to any plastic parts, as these are often the most vulnerable to UV damage.
If you’re storing your kayak outside, invest in a good quality kayak cover. And when I say good quality, I mean it. Don’t cheap out on this, folks. A proper cover will protect your kayak not just from the sun, but also from rain, bird droppings (don’t get me started on how acidic those can be!), and other environmental nasties.
When you’re out on the water, try to be mindful of sun exposure. If you’re taking a break for lunch, try to pull up under some trees or create some shade for your kayak. Every little bit helps.
And here’s something I bet you didn’t know – UV damage can happen even on cloudy days. Those sneaky rays can penetrate cloud cover, so don’t let your guard down just because the sun isn’t out in full force.
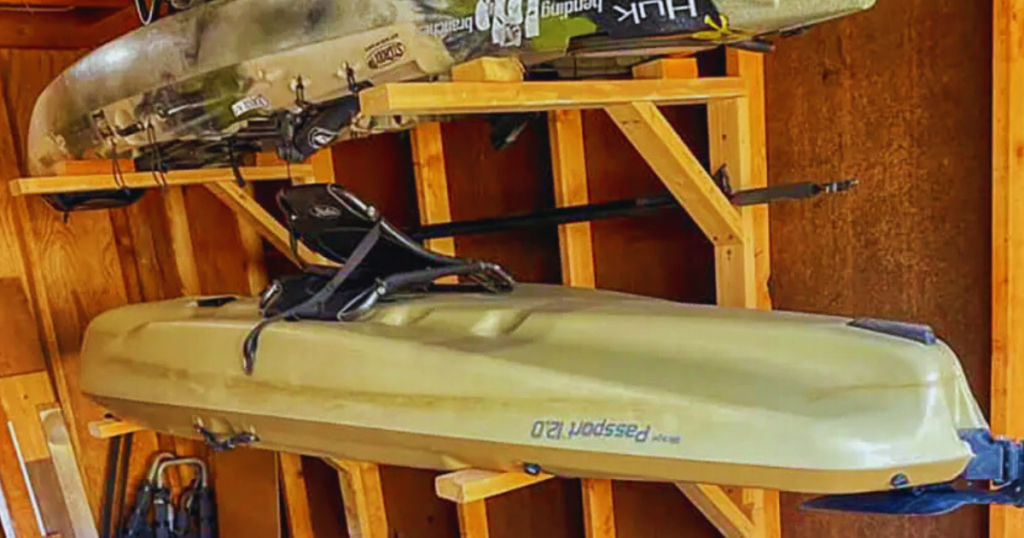
Store Your Kayak Properly
Alright, fellow paddlers, let’s chat about something that’s caused me more headaches than I care to admit: kayak storage. You might think, “How hard can it be? Just toss it in the garage and forget about it, right?” Wrong! Oh boy, is that wrong?
I’ll never forget the time I stored my kayak by leaning it against the wall in my garage. Seemed like a good idea at the time. Fast forward to spring, and I found my poor kayak warped like a banana. Not exactly the sleek vessel I remembered.
So, let’s dive into the dos and don’ts of kayak storage, shall we? First things first: location, location, location. Your kayak’s home away from the water is crucial. Ideally, you want a spot that’s cool, dry, and out of direct sunlight. My go-to is a corner of the garage, but a shed or basement works great too.
Now, here’s the million-dollar question: how exactly should you position your kayak? Drumroll, please… The best way is to store it on its side or upside down. Why? Because storing it hull-down (like it sits in the water) can cause the bottom to flatten over time. And nobody wants a flat-bottomed kayak unless you’re planning on entering it in a floating table contest.
But here’s the kicker – you can’t just plop it on the ground and call it a day. Oh no, that’s a recipe for disaster. You need to elevate that baby! Kayak racks are a godsend for this. They keep your kayak off the ground and distribute its weight evenly.
If you’re feeling handy, you can even build your rack. I once MacGyvered a pretty sweet setup using some 2x4s and foam pool noodles. Not the prettiest thing in the world, but it did the job!
For those of you tight on space (I see you, apartment dwellers), consider a ceiling storage system. These nifty contraptions use pulleys to hoist your kayak up and out of the way. Just be sure to pad the contact points to avoid any pressure dents.
Speaking of pressure dents, here’s a pro tip: avoid storing your kayak on sawhorses or any narrow supports. These can create dents or weak spots over time. If you must use sawhorses, lay a wooden plank across them to distribute the weight more evenly.
Now, let’s talk about the kayak’s mortal enemy: moisture. Storing your kayak in a damp environment is like inviting mould and mildew to a house party – they’ll show up uninvited and refuse to leave. If your storage area is prone to dampness, consider using a dehumidifier or moisture-absorbing packets.
Oh, and here’s something that took me way too long to figure out – remove all gear from your kayak before storing it long-term. That includes seats, backrests, and any other removable parts. Store these separately to prevent mould growth and allow air to circulate freely inside the kayak.
One more thing – if you’re storing your kayak outside (which isn’t ideal, but sometimes life gives you lemons), invest in a good quality kayak cover. And I mean good quality. None of that bargain bin nonsense. A proper cover will protect your kayak from UV rays, rain, and curious critters looking for a new home.
Don’t forget about your kayak during the off-season. Check on it periodically, give it a little pat (hey, kayaks need love too!), and make sure it’s not under any undue stress.
It’s about preserving its shape, preventing damage, and ensuring that when the paddling season rolls around again, your trusty red kayak is ready for action.
Perform Regular Inspections
We’re about to dive into a topic that might not be as exciting as planning your next water adventure, but trust me, it’s just as important. We’re talking about regular kayak inspections. Now, I know what you’re thinking – “Inspections? Boring!” But hear me out, because this could be the difference between a fantastic day on the water and, well, an unexpected swimming lesson.
Let me tell you a little story. A few years back, I was gearing up for a multi-day kayaking trip. I was so excited about the adventure ahead that I skipped my usual pre-trip inspection. Big mistake. Huge. On day two, while navigating some choppy waters, I noticed my kayak was handling a bit… funky. Turns out, there was a small crack in the hull that I hadn’t spotted. Let’s just say the rest of the trip involved a lot more bailing water and a lot less enjoying the scenery.
So, learn from my mistakes, Paddlers. Regular inspections are your ticket to worry-free paddling. But what exactly should you be looking for? Well, grab a snack and get comfy, because I’m about to drop some knowledge on you.
First up, let’s talk about cracks and dents. These sneaky little devils can pop up when you least expect them. Run your hands along the entire hull of your kayak. Feel for any irregularities – bumps, dips, or rough spots. Pay extra attention to areas that take more abuse, like the bow and stern. If you spot a crack, no matter how small, don’t ignore it! Small cracks have a nasty habit of becoming big problems if left unchecked.
Next, let’s move on to wear and tear. Check areas where your body comes into contact with the kayak, like the cockpit rim and seat. Look for signs of excessive wear, fraying, or thinning material. These spots are prime candidates for future issues if not addressed early.
Now, onto the often-overlooked heroes of your kayak – the hardware and fittings. I’m talking about things like rudder cables, footpegs, and bungee cords. Give each of these a good once-over. Are the cables fraying? Do the foot pegs adjust smoothly? Are the bungees still springy? These might seem like small details, but they can make a big difference in your paddling experience.
Don’t forget about the hatches and bulkheads. These are crucial for keeping your gear dry and your kayak buoyant. Check that the hatch covers seal properly and that there are no signs of leaking. If you have a sit-inside kayak, inspect the bulkheads for any cracks or separation from the hull.
Now, I know what some of you might be thinking – But I baby my kayak! Surely I don’t need to inspect it that often Well, let me tell you, even the most pampered kayaks can develop issues. I recommend a quick visual inspection before every outing and a more thorough hands-on inspection at least once a month during paddling season.
The goal here isn’t to find problems – it’s to prevent them. By catching issues early, you can often address them before they become major headaches. And trust me, a little prevention goes a long way in extending the lifespan of your beloved kayak.
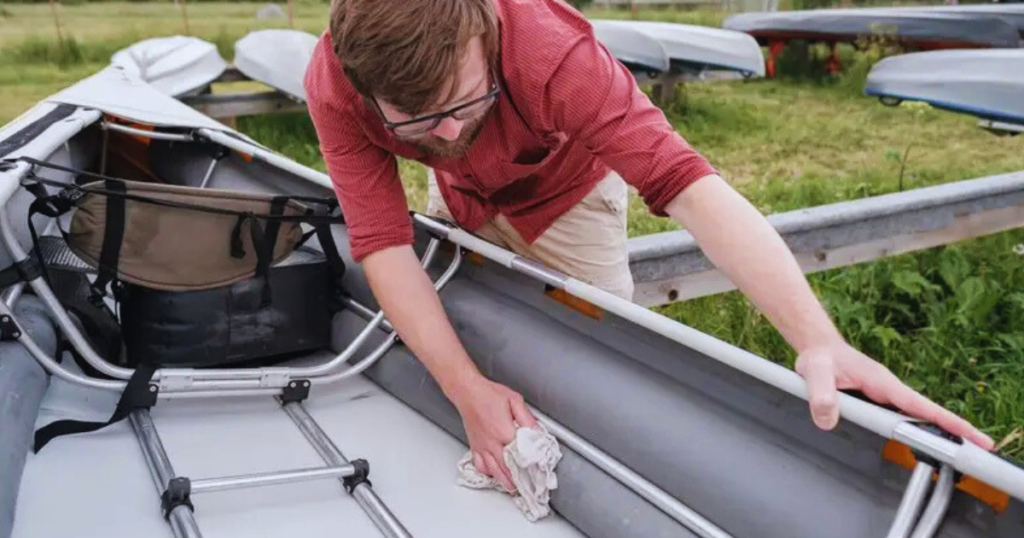
Maintain Your Kayak’s Hull
Paddle pals, let’s chat about something that’s often out of sight but should never be out of mind – your kayak’s hull. You know, that part of your kayak that’s actually in the water? Yeah, that one. It’s like the foundation of a house – if it’s not in good shape, everything else is gonna go downhill faster than a kayak in rapids.
Now, I’ll be the first to admit that I used to be pretty clueless about hull maintenance. I figured, “Hey, it’s designed to be in the water, so it’ll take care of itself, right?” Oh boy, was I wrong? It wasn’t until I noticed my kayak performing more like a stubborn mule than a sleek water vessel that I realized I needed to up my hull maintenance game.
So, let’s start with the basics – keeping that hull clean. After every trip, give your hull a good rinse with fresh water. This isn’t just about making it look pretty (although a clean kayak is a happy kayak, in my book). It’s about removing any salt, algae, or other gunk that can eat away at your hull over time. Think of it like brushing your teeth – a little regular maintenance goes a long way in preventing bigger problems down the line.
Now, here’s where things get a bit more interesting – applying a protective wax coating. This is like sunscreen for your kayak’s hull. It helps protect against UV damage, makes your kayak more resistant to scratches, and can even help it glide through the water more smoothly. Win-win-win.
When it comes to waxing, I like to channel my inner Karate Kid – “Wax on, wax off.” Start with a clean, dry hull and apply the wax in small circular motions. Work in sections, and don’t forget the sides of the hull – they need love too! Once you’ve covered the entire hull, let it dry to a haze, then buff it off with a clean, dry cloth. Voila! Your hull is now protected and looking as shiny as a new penny.
But what about those pesky scratches and gouges? They happen to the best of us. I once had a run-in with a submerged log that left a nasty scratch on my hull. It looked like my kayak had lost a fight with an angry beaver.
For small scratches, a bit of marine-grade rubbing compound can work wonders. Apply it with a soft cloth, rub it in circles, and watch those scratches fade away like magic. For deeper gouges, you might need to break out the big guns – a kayak repair kit. These usually come with epoxy or a plastic welding kit that can fill in those deeper battle scars.
If you’re dealing with a lot of scratches or your hull is looking a bit worse for wear, consider a professional hull treatment. This is like sending your kayak to a spa day. They’ll clean it, repair any damage, and often apply a special coating that can make your hull more resistant to future damage. It’s not cheap, but it can add years to your kayak’s life.
Conclusion
We’ve paddled through a sea of tips and tricks to keep your red beauty in shipshape condition. Remember, extending your kayak’s lifespan isn’t rocket science – it’s all about consistent care and a little bit of elbow grease. From giving it a good scrub after each adventure to storing it like royalty, these simple steps can turn your kayak into the Methuselah of watercraft. Trust me, your future self will thank you when you’re still gliding across lakes in that same red kayak years down the line, looking as fresh as the day you bought it. So, what are you waiting for? Get out there, show your kayak some love, and may your paddling days be long and your capsizes few.
FAQs About Extending Your Red Kayak’s Lifespan
How often should I clean my kayak?
Clean your kayak after every use. A quick rinse and dry can work wonders! For a deep clean, aim for at least once a month during paddling season.
Can I use regular household cleaners on my kayak?
Nope! Stick to mild, biodegradable soaps or cleaners specifically designed for kayaks. Harsh chemicals can damage the hull material.
How should I store my kayak during winter?
Store it indoors if possible, off the ground, and on its side or upside down. Use kayak cradles or padded supports to distribute weight evenly. Always clean and dry it thoroughly before long-term storage.
Is it okay to leave my kayak outside?
While indoor storage is best if you must store it outside, use a high-quality kayak cover and keep it off the ground. Avoid direct sunlight and check on it regularly.
How do I know if my kayak needs repairs?
Regularly inspect your kayak for cracks, deep scratches, dents, or any changes in hull shape. If you notice any of these, it’s time for some TLC or professional repair.
Can I repair small cracks or holes myself?
Yes, for minor damage. Use a kayak repair kit suitable for your kayak’s material. For larger issues or if you’re unsure, consult a professional.
How often should I apply UV protection?
Apply UV protectant at the start of each paddling season and reapply every 3-4 months, or more frequently if your kayak gets a lot of sun exposure.
Is it necessary to wax my kayak?
While not necessary, waxing can protect your kayak’s hull, make it easier to clean, and even improve its performance in the water. Aim to wax it 1-2 times per season.
How long should a well-maintained kayak last?
With proper care, a quality kayak can last 15-20 years or even longer. Some paddlers report using the same kayak for 30+ years!
Can I pressure wash my kayak?
It’s best to avoid pressure washing as it can force water into areas it shouldn’t go to and potentially damage the hull. Stick to gentle cleaning methods instead.

Nigel Foster, born in 1952, is an esteemed sea kayaker, known for being the youngest to kayak around Iceland. His journey in kayaking started at 15 in Brighton, England. With a career beginning as a trainee instructor in Sussex, he later pursued teaching after attending Redland College, Bristol.
Foster’s notable expeditions include navigating the challenging waters of Newfoundland and the Hudson Strait. Despite facing intense conditions, his passion for kayaking never waned. He holds several British Canoe Union qualifications and has significantly contributed to the kayaking community through teaching and committee work.
In 1985, Foster expanded his horizons by assisting an expedition in Iceland and later founded his own kayaking business, sharing his expertise globally.