Kayaking is an exhilarating way to explore waterways and connect with nature. But before you can paddle your way to adventure, you need to get your kayak to the water safely. Learning how to strap a kayak to a roof rack is an essential skill for any kayak enthusiast. Whether you’re a seasoned paddler or a newcomer to the sport, mastering this technique ensures your kayak arrives at its destination securely and without damage.
Properly strapping your kayak to your vehicle’s roof rack is crucial for several reasons:
Safety: A securely fastened kayak prevents accidents on the road, protecting both you and other drivers.
Legal compliance: Many regions have laws regarding the proper securing of loads on vehicles.
Kayak protection: Correct strapping prevents damage to your kayak during transport.
Peace of mind: Knowing your kayak is properly secured allows you to focus on the journey ahead.
In this comprehensive guide, we’ll walk you through every step of how to strap a kayak to a roof rack. From understanding your equipment to performing safety checks, we’ll cover all the essential information you need to transport your kayak with confidence. Whether you’re driving to a local lake or embarking on a cross-country kayaking expedition, these techniques will ensure your kayak is ready for the ride.
Table of Contents
Types of Roof Racks
The foundation of safely transporting your kayak is a reliable roof rack system. There are three main types of roof racks you might encounter:
Factory-installed racks: Many vehicles come with built-in roof racks. These are typically parallel bars that run from front to back on your vehicle’s roof. While convenient, they may require additional accessories for optimal kayak transport.
Aftermarket racks: These are customizable systems that can be installed on most vehicles. Popular brands include Thule, Yakima, and Rhino-Rack. Aftermarket racks often offer more versatility and can be tailored to your specific needs.
Temporary foam blocks: For occasional kayakers or those without a permanent roof rack, foam blocks can be a temporary solution. These sit directly on your vehicle’s roof and provide a cushioned base for your kayak.
| Rack Type | Pros | Cons |
| Factory-installed | Already on vehicle, often aerodynamic | May need additional accessories |
| Aftermarket | Customizable, sturdy | More expensive, requires installation |
| Temporary foam blocks | Affordable, easy to use | Less secure, not suitable for long distances |
Essential Straps and Accessories
Once you have a roof rack, you’ll need the right straps and accessories to secure your kayak:
Cam straps vs. ratchet straps: Cam straps are the most commonly recommended for kayaks. They’re easy to use and less likely to overtighten and damage your kayak. Ratchet straps provide more tension but can easily be overtightened, potentially damaging your kayak.
Bow and stern tie-downs: These additional straps secure the front and back of your kayak to your vehicle’s frame, providing extra stability during transport.
Padding and protection: Hull pads or kayak cradles sit on your roof rack and provide a cushioned surface for your kayak. Crossbar pads wrap around your roof rack bars, offering protection for both your kayak and your vehicle.
Preparing Your Vehicle and Kayak
Before you begin the process of strapping your kayak to your roof rack, it’s essential to properly prepare both your vehicle and your kayak. This preparation ensures a secure fit and helps prevent damage during transport.
Cleaning and Inspecting Your Roof Rack
A clean and well-maintained roof rack is crucial for safely transporting your kayak. Follow these steps to prepare your roof rack:
Clean the rack: Use a damp cloth to wipe down your roof rack, removing any dirt, debris, or salt buildup. This ensures a better grip for your straps and prevents abrasive particles from damaging your kayak.
Inspect for damage: Carefully examine your roof rack for any signs of wear, rust, or damage. Pay special attention to:
- Attachment points to your vehicle
- Crossbars
- Any moving parts or adjustment mechanisms
Check tightness: Ensure all bolts and fasteners are tight. Loose components can compromise the stability of your kayak during transport.
Apply lubricant: If your rack has any moving parts, apply a silicone-based lubricant to keep them functioning smoothly.
Safety Tip: If you notice any significant damage or wear on your roof rack, replace the affected components before transporting your kayak. It’s always better to err on the side of caution when it comes to roof rack integrity.
Positioning Your Kayak
The way you position your kayak on the roof rack can significantly affect its stability during transport. Consider the following factors:
Hull up vs. hull down debate: Hull up (cockpit facing up) is generally recommended for most kayaks. This position reduces wind resistance and is less likely to collect rainwater. Hull down can be preferable for kayaks with irregular hull shapes or if you’re using J-cradles.
Centering the kayak on the vehicle: Place the kayak so that it’s centered left-to-right on your vehicle. The kayak’s center of gravity should be between the rack’s crossbars.
Angle considerations: For long trips or highway driving, a slight angle with the bow (front) pointing down can reduce wind resistance. Ensure the angle doesn’t interfere with your vehicle’s operation or visibility.
Step-by-Step Guide: How to Strap Kayak to Roof Rack

Now that you’ve prepared your vehicle and positioned your kayak, it’s time to secure it to your roof rack. This step-by-step guide will walk you through the process of how to strap a kayak to a roof rack safely and effectively.
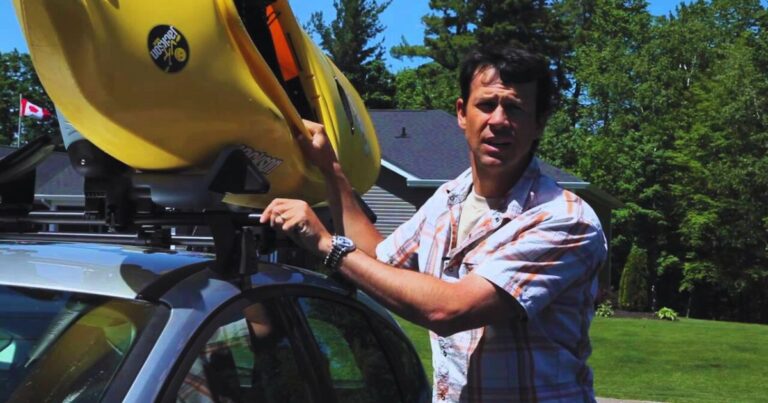
Lifting the Kayak
Before you can strap your kayak down, you need to get it onto your vehicle’s roof. This step requires careful handling to avoid injury to yourself or damage to your kayak or vehicle.
Proper lifting techniques:
- Stand at the side of the kayak, near the cockpit.
- Bend your knees and keep your back straight.
- Grip the kayak by the cockpit rim with both hands.
- Lift with your legs, not your back, and raise the kayak to your thighs.
- Slowly stand up, lifting the kayak overhead.
Getting help for heavier kayaks:
- For kayaks over 50 pounds, it’s safer to lift with a partner.
- Position one person at each end of the kayak.
- Lift in unison, using the same technique described above.
- Coordinate your movements to place the kayak on the roof rack.
Placing the Kayak on the Rack
Once you’ve lifted the kayak, you need to place it correctly on your roof rack.
- Gently lower the kayak onto the rack, ensuring it’s centered both front-to-back and side-to-side.
- If using kayak cradles or J-hooks, make sure the kayak is properly seated in them.
- Double-check that the kayak isn’t interfering with your vehicle’s doors, antenna, or rear hatch.
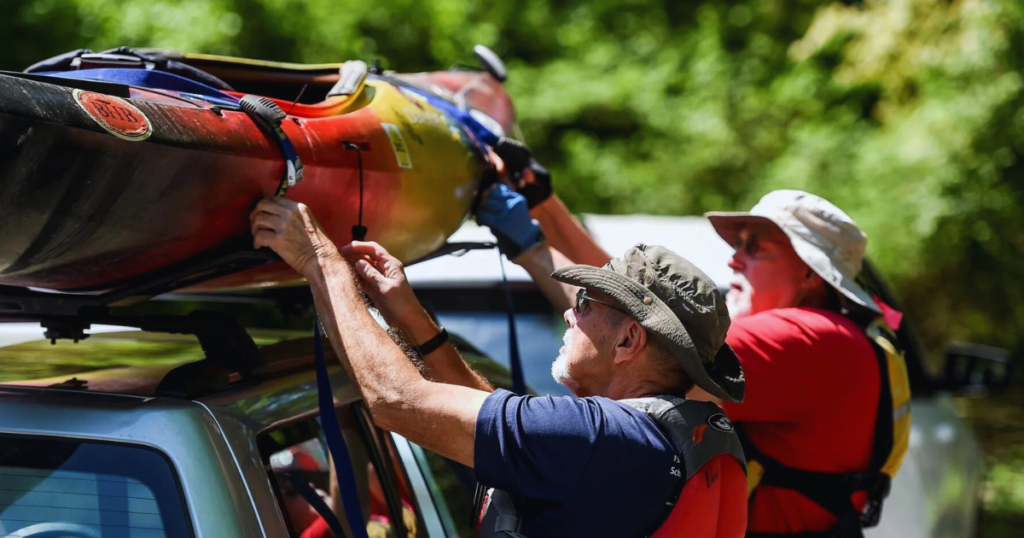
Securing the Kayak with Straps
This is the crucial step in how to strap a kayak to a roof rack. Proper strap placement and tension are key to safe transport.
Strap placement:
- Use two straps, one for each crossbar of your roof rack.
- Position the straps a few feet apart for optimal stability.
Strapping technique:
- Throw the strap over the kayak, ensuring it doesn’t twist.
- Feed the loose end under the roof rack crossbar and back up to the buckle.
- Thread the strap through the buckle and pull to tighten.
- Repeat on the other side of the kayak.
Tightening tips:
- Alternate sides as you tighten to keep pressure even.
- The straps should be snug but not so tight that they deform the kayak.
- You should be able to slide your fingers under the strap when it’s properly tightened.
Securing loose ends:
- Tie off any excess strap length to prevent flapping in the wind.
- You can use a simple overhand knot or tuck the excess under the tensioned part of the strap.
Common Mistakes to Avoid:
- Over-tightening straps, which can damage your kayak
- Routing straps through scupper holes (on sit-on-top kayaks), which can cause stress on the kayak’s structure
- Using stretched-out or frayed straps that may fail during transport
Attaching Bow and Stern Tie-Downs
- For added security, especially on longer trips or at highway speeds, bow and stern tie-downs are essential.
- Attach one end of the tie-down to the bow of your kayak, using the carry handle or a dedicated tie-down point.
- Secure the other end to a sturdy part of your vehicle’s frame, such as a tow hook or bumper bracket.
- Repeat the process at the stern of the kayak.
- Tighten the tie-downs until snug, but be careful not to overtighten as this can warp your kayak over time.
Pro Tip: Use a figure-eight knot or a trucker’s hitch for secure, adjustable tie-downs that are easy to undo when you reach your destination.
Tips for Different Kayak Types
While the basic principles of how to strap a kayak to a roof rack remain the same, different kayak types may require slight adjustments to your approach. Let’s explore some specific tips for the most common kayak types.
Strapping a Sit-On-Top Kayak
Sit-on-top kayaks are popular for their stability and ease of use, but their open design requires some special considerations when strapping to a roof rack.
Avoid scupper holes: Never run straps through the scupper holes, as this can stress and damage the kayak’s structure.
Use the kayak’s molded handles: Many sit-on-top kayaks have molded-in handles that make excellent anchor points for your straps.
Consider a kayak carrier: J-style carriers or stackers can be particularly useful for sit-on-top kayaks, especially when transporting multiple kayaks.
Drain before transport: Ensure any water has drained from the kayak before strapping it down to avoid added weight and potential imbalance.
Securing a Sit-Inside Kayak
Sit-inside kayaks have a more traditional design with an enclosed cockpit, which can affect how you strap them to your roof rack.
Cockpit cover: Use a cockpit cover to prevent water accumulation and reduce wind resistance during transport.
Upside-down positioning: Sit-inside kayaks are often transported upside-down (hull up) to reduce wind resistance.
Strap placement: Place straps just in front of and behind the cockpit for the most secure hold.
Padding: Use extra padding around the cockpit rim to prevent strap abrasion.
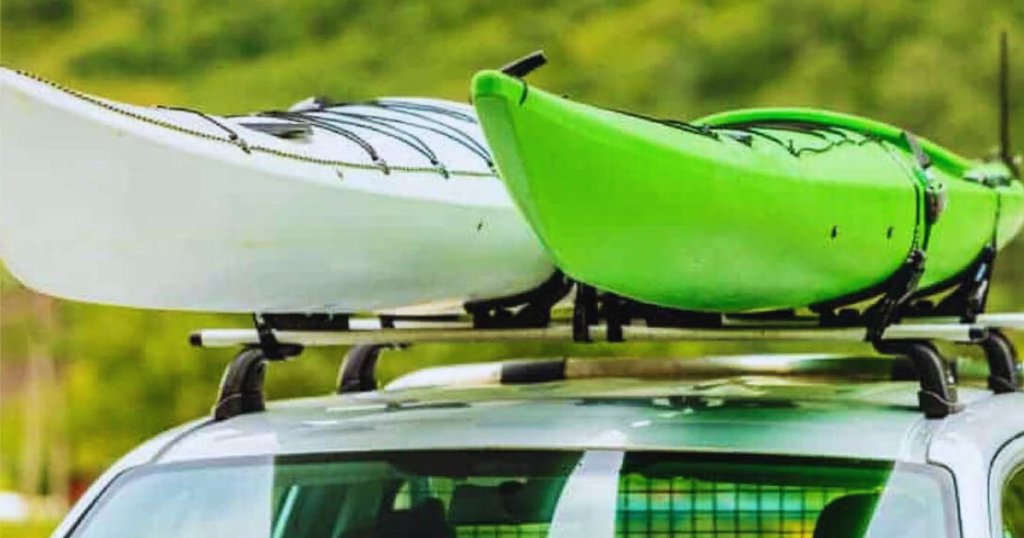
Transporting Multiple Kayaks
If you’re heading out with friends or family, you may need to transport multiple kayaks on your roof rack. Here are some tips to do it safely:
Stack or side-by-side: Depending on your roof rack and kayak size, you can either stack kayaks on top of each other or place them side-by-side.
Use proper carriers: J-cradles or stacker bars can help you securely transport multiple kayaks.
Alternate directions: If stacking, consider placing kayaks in alternating directions (bow to stern) for better weight distribution.
Individual strapping: Always strap down each kayak individually for maximum security.
Check weight limits: Ensure the combined weight of your kayaks doesn’t exceed your vehicle’s roof weight limit.
Table: Kayak Type Comparison for Roof Rack Transport
| Kayak Type | Best Position | Special Considerations | Recommended Accessories |
| Sit-On-Top | Hull down or on side in J-cradle | Avoid strapping through scupper holes | J-style carriers, stackers |
| Sit-Inside | Hull up (upside-down) | Use cockpit cover | Cockpit cover, extra padding |
| Multiple Kayaks | Stacked or side-by-side | Check vehicle weight limits | J-cradles, stacker bars |
Pro Tip: Regardless of kayak type, always do a “shake test” after strapping down your kayak(s). Gently rock your vehicle and check if there’s any movement in the kayaks. If they shift, tighten your straps and recheck.
Safety Checks Before Hitting the Road
After you’ve strapped your kayak to your roof rack, it’s crucial to perform a series of safety checks before starting your journey. These final inspections ensure that your kayak is secure and that your vehicle is safe to drive. Let’s go through a comprehensive checklist to make sure you’ve covered all bases in how to strap a kayak to a roof rack safely.
Final Inspection of All Straps and Tie-Downs
Strap Tension:
- Check each strap individually for proper tension.
- You should be able to slip a finger under the strap, but it shouldn’t be loose.
- Ensure straps are not overtightened, which could damage your kayak.
Strap Placement:
- Verify that straps are positioned correctly on the kayak and roof rack.
- Ensure straps aren’t twisted or tangled.
Bow and Stern Tie-Downs:
- Confirm that bow and stern tie-downs are securely fastened to strong points on your vehicle.
- Check that the tie-downs have appropriate tension without pulling the kayak down too much.
Loose Ends:
- Secure any loose strap ends to prevent flapping during travel.
- Double-check that all buckles are properly closed and locked.
Vehicle Checks
Roof Rack:
- Ensure the roof rack itself is still securely attached to your vehicle.
- Check for any signs of stress or movement in the rack system.
Vehicle Clearance:
- Verify that your kayak doesn’t interfere with your vehicle’s doors, windows, or antenna.
- Ensure the kayak doesn’t obstruct your view through any windows.
Vehicle Balance:
- Stand back and check that the kayak is level and centered on your vehicle.
- An off-balance load can affect your vehicle’s handling, especially in windy conditions.
Test Drive Considerations
Before embarking on your main journey, it’s wise to take a short test drive. This allows you to check for any issues that might only become apparent when the vehicle is in motion.
Start Slow: Begin with a slow drive around your neighborhood or in a parking lot.
Listen for Unusual Noises: Any whistling, flapping, or rattling could indicate a loose strap or improperly secured kayak.
Check for Movement: After driving for a short distance, stop and inspect the kayak and straps for any shift in position.
Gradual Speed Increase: If everything seems secure, gradually increase your speed, continuing to listen and feel for any changes.
Sharp Turns: Carefully make some turns to ensure the kayak remains stable during directional changes.
En Route Checks
- For longer journeys, it’s important to periodically check your kayak’s security:
- Stop after the first 15 minutes of your trip to re-check all straps and tie-downs.
- On extended trips, check your kayak every time you stop for gas or breaks.
- Be especially vigilant if driving through adverse weather conditions, as wind and rain can affect strap tension.
Common Mistakes to Avoid When Strapping a Kayak to a Roof Rack

Even experienced kayakers can sometimes make errors when securing their kayaks for transport. Being aware of these common mistakes can help you avoid potential issues and ensure you’re correctly implementing how to strap a kayak to a roof rack. Let’s explore some of the most frequent pitfalls and how to avoid them.
Forgetting Bow and Stern Tie-Downs
One of the most critical mistakes is neglecting to use bow and stern tie-downs.
Why it’s a problem:
- Without front and rear tie-downs, your kayak is at risk of lifting at high speeds or in strong winds.
- This can put extreme stress on your roof rack and straps, potentially leading to failure.
How to avoid it:
- Always use bow and stern tie-downs, especially for highway travel or long distances.
- Ensure tie-downs are connected to strong points on both the kayak and your vehicle.
Using Damaged or Worn Straps
Using old, frayed, or sun-damaged straps is a recipe for disaster.
Why it’s a problem:
- Worn straps can break under stress, leading to kayak detachment.
- UV-damaged straps may look fine but have significantly reduced strength.
How to avoid it:
- Inspect your straps before each use.
- Replace straps showing signs of wear, fraying, or discoloration.
- Store straps out of direct sunlight when not in use.
Improper Strap Routing
Incorrectly routing straps can lead to insecure attachment or damage to your kayak.
Why it’s a problem:
- Straps routed through scupper holes can damage sit-on-top kayaks.
- Improperly routed straps may loosen during transit.
How to avoid it:
- Always route straps over the kayak and under the roof rack bars.
- Never pass straps through scupper holes or other structural features of the kayak.
- Use dedicated tie-down points or carry handles when available.
Overtightening Straps
While it might seem counterintuitive, overtightening your straps can be just as dangerous as loose straps.
Why it’s a problem:
- Excessive tension can deform or damage your kayak, especially if it’s made of plastic.
- Overtight straps can actually work loose as the kayak flexes during transport.
How to avoid it:
- Tighten straps until snug, then give a slight additional turn.
- You should be able to slip a finger under the strap when properly tightened.
- Check tension after driving for a short distance and adjust if necessary.
Neglecting Regular Checks
Failing to check your kayak’s security during your journey is a common oversight.
Why it’s a problem:
- Straps can loosen over time due to vibration and kayak movement.
- Weather changes (like rain) can affect strap tension.
How to avoid it:
- Check your kayak’s security at every stop during your journey.
- Make a special stop to check straps after the first 15 minutes of driving.
Ignoring Vehicle Weight Limits
Overloading your vehicle’s roof can lead to dangerous driving conditions and potential damage.
Why it’s a problem:
- Exceeding weight limits can affect vehicle handling and stability.
- It may cause damage to your vehicle’s roof or rack system.
How to avoid it:
- Know your vehicle’s roof weight limit (check your owner’s manual).
- Calculate the combined weight of your rack, kayak(s), and any other roof-mounted gear.
- Consider alternative transport methods if you’re close to or exceeding the limit.
Table: Common Mistakes and Their Solutions
| Mistake | Potential Consequence | Solution |
| Forgetting tie-downs | Kayak lift-off at high speeds | Always use bow and stern tie-downs |
| Using worn straps | Strap failure and kayak detachment | Always use bow and stern tie-downs |
| Improper strap routing | Insecure attachment or kayak damage | Route straps correctly over kayak and under rack |
| Overtightening | Kayak deformation or strap loosening | Tighten until snug, allow slight give |
| Neglecting checks | Gradual loosening during transit | Check security at regular intervals |
| Ignoring weight limits | Poor vehicle handling, potential damage | Know and respect your vehicle’s weight limits |
Remember, mastering how to strap a kayak to a roof rack is not just about the initial setup, but also about maintaining that security throughout your journey. In the next section, we’ll discuss how to maintain your kayak strapping equipment to ensure its longevity and reliability.
Conclusion
Mastering how to strap a kayak to a roof rack is an essential skill for any kayaking enthusiast. Throughout this guide, we’ve covered everything from understanding your equipment and proper preparation to the step-by-step strapping process and crucial safety checks. We’ve also addressed common mistakes to avoid and provided tips for maintaining your strapping equipment. Remember, the key to safe kayak transport lies in attention to detail, regular checks, and proper equipment maintenance. By following these guidelines, you’ll ensure that your kayak arrives safely at your destination, allowing you to focus on what really matters enjoying your time on the water. Whether you’re a beginner or an experienced paddler, implementing these practices will give you peace of mind and set the stage for countless enjoyable kayaking adventures. So strap up, stay safe, and happy paddling!
FAQs About Strapping Kayaks to Roof Racks
When learning how to strap a kayak to a roof rack, many paddlers have common questions. Here are frequently asked questions and their answers to help you transport your kayak safely and efficiently.
What type of straps should I use to secure my kayak?
Use cam straps or ratchet straps specifically designed for kayak transport. Cam straps are often preferred as they’re less likely to overtighten and damage your kayak. Avoid bungee cords or rope, as these aren’t secure enough for safe transport.
How many straps do I need to safely secure a kayak?
At minimum, use two straps to secure the kayak to your roof rack. Place these straps around the kayak and roof rack at the front and rear of the boat. For added security, especially on longer trips or at higher speeds, use a third strap in the middle.
Should I use a bow and stern line in addition to roof rack straps?
Yes, it’s highly recommended to use bow and stern lines. These provide additional security by preventing the kayak from shifting forward or backward during sudden stops or acceleration. Attach these lines from the bow and stern of the kayak to secure points on your vehicle’s front and rear.
How tight should I make the straps when securing my kayak?
Straps should be tight enough to prevent any movement of the kayak, but not so tight that they deform or damage the hull. You should be able to slide your finger under the strap with some resistance. Remember, plastic kayaks can warp if straps are too tight, especially in hot weather.
What’s the best way to protect my kayak and car from damage during transport?
Use foam blocks or kayak saddles on your roof rack to cushion and support the kayak. Consider using a cockpit cover to prevent wind from getting under the kayak. Always ensure your kayak is clean and your car roof is free of dirt to prevent scratching. For added protection, you can place small towels under the areas where the straps contact the kayak.
Can I strap multiple kayaks to my roof rack? If so, how?
Yes, you can typically strap two or more kayaks to a roof rack, depending on the rack’s capacity and your vehicle’s weight limit. For two kayaks, you can place them side by side (hull to hull) or stacked (hull to cockpit). Use separate straps for each kayak and ensure they’re not touching each other to prevent damage. For three or more kayaks, you may need specialized stackers or j-cradles.
How do I know if my roof rack is strong enough to hold my kayak?
Check your vehicle’s owner manual and roof rack specifications for weight limits. Most factory-installed roof racks can handle at least 150 pounds, which is sufficient for most kayaks. Aftermarket racks often have higher weight limits. Always factor in the weight of the rack itself, any accessories, and all kayaks if carrying multiple boats. If in doubt, consult with a rack specialist or your vehicle manufacturer.

Nigel Foster, born in 1952, is an esteemed sea kayaker, known for being the youngest to kayak around Iceland. His journey in kayaking started at 15 in Brighton, England. With a career beginning as a trainee instructor in Sussex, he later pursued teaching after attending Redland College, Bristol.
Foster’s notable expeditions include navigating the challenging waters of Newfoundland and the Hudson Strait. Despite facing intense conditions, his passion for kayaking never waned. He holds several British Canoe Union qualifications and has significantly contributed to the kayaking community through teaching and committee work.
In 1985, Foster expanded his horizons by assisting an expedition in Iceland and later founded his own kayaking business, sharing his expertise globally.